Pages

Followers - Thanks for showing me love :)

Tuesday, December 28, 2010

Jesse's Girl Stardust Powder Eyeshadow Swatches

I want to apologise for the laziness, not because I’m bored of blogging but I am absolutely blanked with what makeup I would like to show. I’ve been doing looks but I absolutely hate them or they don’t turn up like I want them too, thus I have nothing to share.

Anyway I stress first thing that everything I mention today is bought with my own money and they are not sponsored/free from Jesse’s Girl. I was not paid to do this review or show these swatches and everything here is based on my own opinion and experience with them. Therefore they may not be the same as other people who had already reviewed or swatched them.


6 colours to choose from

There are 6 shades in this series and each one cost US $4.49 each or you can get it in a set of 6 for US $24 (which is what I did). I actually bought these ages ago and put them aside to use another day and to share some swatches, but I cleaned the whole vanity and put them in the drawers…. Then I forgot them :p bad girl I am!


I find the packaging quite cute with a little bling star on the corner of the lid and a bonus for me is always a clear lid! That way when I do reach for them I can see which colour it is without having to open all of them to see. The plastic is not that thin flexible stuff and it feels really sturdy and strong, so I like that very much. Just beware though that all of these shades are shimmer/glitter shades so if you’re not a fan of that then these are definitely not for you. In the end I did find that the shades it was limited was a bit small, so hopefully in the future there will be more colours to choose from.


Pretty shimmer/glitter shine to the eyeshadows

The pigmentation of these eyeshadows is amazing!  I love them and even without a base under them they are great.  The black (Galaxy) without a base is a little on the powdery/chalky side but with a base it is wonderful.  The eyeshadow is really soft and smooth so when you apply it, it doesn’t feel chunky or chalky and they blend fairly easily as well.  Check out the photos for the swatches and you might just see what I mean.

With Flash
Top without a base
Bottom with a base

Without flash
Top without a base
Bottom with a base
 For anyone interested in these please visit the Jesse’s Girl website here to make your purchases:


http://www.jessesgirlcosmetics.com/


Now just a quick peek on my makeup ideas that I didn’t like thus I didn’t go ahead and make picture tutorials or complete…


Covering big red pimple on the nose :p

Didn't turn out the way i wanted it thus I didn't complete it

Friday, December 24, 2010

Daily Makeup and update

I know I haven’t being posting much makeup look and stuff lately, but I’m going through one of those period where my mind is blank and every time I try to sit down and something different or get creative I just go blank. It’s quite frustrating so hence I haven’t got much to post lately.

However I thought I would just share some photos of my makeup that I’ve being wearing on a daily basis. I seriously mean it when I say daily; it’s the same every day. Simple eyes with browns and instead of black liner I used black matte eyeshadow instead.


What I've been wearing everyday

New brown coloured contacts

Just some browns and black matte eyeshdow as liner

Pulled the hair back
I also would appreciate some ideas that some of you guys might have and you could give me a bit of a shout out in the comment section. Like colour combinations you would like to see for eye makeup. I would love to do another picture tutorial for everyone but since I go blank it’s kind of hard for me to focus.


Another quick question… any idea or suggestion on what hair colour I should dye my hair in January? It’s currently summer and I want a bit of a change. I may also be chopping off my beautiful long hair so don’t be surprised if I do :p

Sigma Makeup Brushes Review

Some of you probably know not too long ago Sigma was having a free shipping promotion so I snatched up this chance to get myself some of their brushes. I’ve read many good reviews about them and really wanted to try them. Well to let you guys know they’re great! I now use them as a part of my professional makeup kit and would definitely recommend them to other people.


I ended up buying myself the complete brush kit without the brush roll (since I already got a brush roll) and the synthetic face kit (which is relatively new).


Complete brush kit without brush roll
All the brushes are of good quality and they’re super soft, they also don’t smell when you first get them so that is a bonus. I washed them and after they dried they are still as they were when I first got them. There was no shedding so that is definitely a bonus with me. I hate it when you buy nice soft brushes but then it sheds like crazy. I’ve used them on friends and they’re definitely great for a makeup artist who is only just starting out and can’t afford to buy all the expensive MAC brushes.
In my opinion they’re just as good as the MAC ones and I seriously can’t find anything to complain about them at the moment. I’ve already had them for about 2 weeks. If you’re not after a whole set then you can also buy them individually.
The synthetic face kit is absolutely wonderful! They’re so dense yet they’re so smooth and soft that I couldn’t stop running the brushes on my hand.


Synthetic face kit (LOVE!) and the free blending brush
The silver brush was a free gift with the purchase of the complete kit and it’s a fluffy blending brush. Very similar to the MAC one and it works just as well, except it’s like a travel size of it so I’ll be adding that one to my travel brushes.


NOTE: Sigma did not pay me to review their products, everything was bought with my own money and this review is based on my honest opinion on their brushes.

Saturday, December 18, 2010

Models Prefer Professional – The Natural Look Compact

Hola!

Jumping in to post about a look I did using something I won in a giveaway that Jennifer was hosting. This is going to be a longer post since I’ll be sharing a bit of swatches and it will also be my very first picture tutorial. I’ve received emails about requesting for some picture tutorials for looks I’ve done. To be honest I’m not great at doing picture tutorial because it requires time and I’m not very patience either.

Anyway I hope this one turns out alright, because I got frustrated trying to get better photos of the eyes.

Models Prefer is a drugstore brand and relatively cheap, something affordable for beginners who are starting out. Some of their products aren’t that great but some are not too bad. Beside if you’re only just starting out, you want to keep things under a budget until you’re ready to branch out into more expensive stuff right?

I received this little compact in Jennifer’s giveaway and I decided to create a look based on it. I also tried to keep most of the other products drugstore as well, but there might be 2 or 3 that are on the higher end. Anyway you can substitute with what you use normally and it is not necessary to go out of your way to buy exactly what I use.


 This little compact is pretty cute, great travel size and the quality of it is not too bad. It comes with 3 eyeshadows, 1 blush and a lipstick. Pretty basic but enough to create a look even with this on its own. However knowing me I like to add this and that to it to enhance the look more.


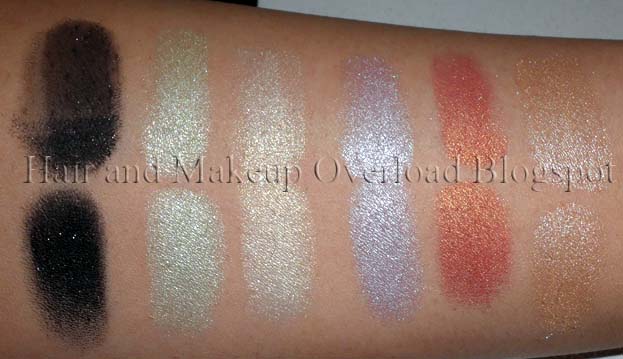
Here are some swatches of the products in the compact…


Without flash
Top without base
Bottom with TFSI

With Flash
 The eye shadows will need to be used over a primer or base in order to bring out the pretty colours, but overall they’re pretty soft and smooth so it goes on very well. Didn’t have much trouble with fall out so that is definitely a good sign. The blush is a bit on the shimmery side but if you don’t overload it, then it can be very complimenting to the skin colour. I’m not a fan of red lipstick and that is my very honest opinion. I find it makes me look tacky so I don’t ever wear it. However for this look I shall make it work! I hope it works… It’s not the best lipstick quality but it is definitely alright and it won’t just dry out your lips.


Now to get on with the actual look, let start off with something a little creepy. My absolute 100% naked face freshly washed with Cetaphil cleanser and then moisturised with Cetaphil as well.


Products I used for this look


Australis Primer (Also from Jen’s giveaway, but I’m currently testing it)

Maybelline Super Stay Makeup – Nude

Eve Pearl Trio Concealer – Medium

Too Faced Shadow Insurance

Cover Girl Professional Loose Powder

Models Prefer Compact in Warm Spice

Australis Eye Pencil – Smoke

Beauty Style Bronzer – Jungle Fever

NYX Mosaic Powder – 01 highlighter

Rimmel Eyebrow Pencil – black brown

Savvy by DB Lip Pencil – Tulip

NYX lip gloss – 21 Frosted Plum


Note I like to do my eye makeup before I do my foundation and what not. This is base on you own preference so if you like doing foundation first then please do so :)

Please also note I have Asian eyes with no actual eyelid visible, so please adjust eyeshadow placement according to your own eye shape.


I use foundation as a base on my eyes before TFSI and then powder to set it.


Define the brow by filling it in to your desired shade and shape.


Highlight your brow bone – I used the lightest colour in the compact.


Pat on a dark shade on the lid and blend out the harsh lines – I used the darkest colour in the compact.


Place the mid-tone colour in the crease and blend it out to just above the crease.


Pat a bit more of the darker colour back on if you’ve over blended.


Line the upper lash line with a grey/charcoal colour and smudge it out – doesn’t have to be neat.


Place the lightest colour on the lower lash line and inner corner of eye to give it a brighter look.

Curl your lashes and apply a generous amount of mascara to your upper and lower lashes.


The eyes are now complete!


Now that you've done your eyes you can go ahead and apply concearl, foundation and powder to the rest of your face :)


Using a lip liner, line your lips and fill them in to make lipstick last longer.


Here I used Savvy by DB lip Pencil in Tulip


Apply lipstick.        

Apply lip gloss to give the lips that nice shine – I only placed a small amount.


Apply Blush (from compact), Bronzer and highlight to your face to give it some nice colour and definition.


The whole face is complete!


Now to share some self shot of myself.


Something you can wear out during the evening for dinner or even for a night of fun with the girls.


Add a nice headband and you’re ready for the weekend activities looking very chick and feminine.


You can even wear this to work and the light colour on the lower lash line will brighten up your eyes where your glasses create shadow.


I hope everyone enjoyed this long post and I hope to do another picture tutorial for you guys soon.

Jen's Joyful Giveaway Prize :D

Recently I won a giveaway!!!

So christmas came early for me this year because I was so happy when I've gotten the prize.

Thanks to Jennifer from Jennifer's Blog http://jlyxoxo.blogspot.com/ for hosting an awesome giveaway with a massive prize.  I felt so lucky to be able to win and to recieve it so fast!

Check her out if you haven't so, she updates quite frequently (more than I do!) and she post about beauty, fashion and other stuff.  IT's a great blog to read and I definitely recommend :D

Now to the photos!

The big package came so quick!

this is how big the package was compared to a normal stapler

cute! a letter and a xmas card :D Jen you're so sweet!

Spoilt!

The little package with accessories inside

cute accessories and my jewellery box is full!

playing with the sunnies!

I will review some of the stuff I got in the package but probably not everything.  Stay tuned soon for a makeup look and my very first picture tutorial :)

Tuesday, December 14, 2010

Green and Gold Christmas Inspired Look

Dropping in to share a full face look with everyone and for the first time this look will be accompanied by a Face Map design.


I’ve finally got hit by the Christmas spirit and greens popped into my head. For those who have followed I for a while now would probably know that I’m not a big fan of green. However this one turned out pretty well so I’m satisfied as of now.


Face Map Design for the look

Completed look
 Products used:


Eve Pearl Moisturising Primer

Maybelline Dream Matte Mousse Foundation

Eve Pearl Concealer

Cover Girl Professional Loose Powder

Too Faced Shadow Insurance

Milani Runway Eyes Fashion Shadows – 05 Glamorous Gems

Rimmel Sun Shimmer Bronzer – Light

Savvy by DB Baked Mineral Blush – Mineral Rose

Savvy by DB Lip Pencil – Carnation

Cover Girl Lipstick – 825 In The Nude Desnudo Chair

Coastal Scents Gel Liner – True Black

Cover Girl Lash Blast Fusion Mascara

NYX Mosaic Powder – 01 Hightlighter

L’Oreal Glam Shine Lip Gloss – 102 Always Pink


Close up of eyes

Close up of closed eyes

say cheese!

I obviously shouldn't wink in photos

Am I trying to pose too hard?

God I look snobby in this photo

This angle makes me look really fat :(

Favourite photo out of all of them

Pout Pout

And of course we have to finish with a weird photo :)
I’m also set up my Pro Blog so if you’re interested I would appreciate your support :)

However there isn’t anything on there at the moment because I haven’t done any post yet. I’m still in my planning phrase and hopefully soon I’ll get things up and running there soon.


http://makeupbymkt.blogspot.com/